I fell in love with this picture I found in a Martha Stewart Living magazine-May 2008 issue. I had intended to use the inspiration for our bedroom makeover but decided to use it for the kitchen instead.


On the Saturday, we started by taking off all of the cabinet doors; sanding and prepping them for painting out on the back deck to keep the dust down in the house.

This is the mess we were left with. I have complained before that my cabinets are all in the wrong place, inaccessible and frustrating. If anyone has any organizational tips I'd love to hear them.

I have to say the one thing that made this whole project tolerable is the fact that we have an air compressor and various air tools. There is no way I would even contemplate brushing and rolling on melamine paint to 22 cabinet doors.
I sprayed one coat to the back of the doors and two coats to the front. Melamine paint is very smelly and is basically liquid plastic. In the last two pictures above, you can see how heavy the air was with paint mist. The respirator I have on is of very good quality and blocks particles and vapours.

I hand painted the trim on the cabinet facing.

We allowed the doors to dry for about 24 hours between coats. It took about two and a half hours to spray each coat. We worked in an assembly line fashion. My husband would bring out some unpainted doors to spray and then I would pass them up to him from the garage where he would then take them down to the basement to dry.
The temperature outside was comfortable for the first two coats of paint but on the Tuesday when we were spraying the final coat on the front of the doors is was really chilly. I think it was probably too cold to be painting outside; they spray gun kept jamming and the paint kept thickening up. In the end it turned out great but this was the only moment that I honestly almost started crying out of frustration.

2 years ago we went to Australia and New Zealand to visit my husbands family. At his cousins house they had this soap called Solvol in the bathroom. Every time I garden or do home renovations I break out the Solvol. It has little bits of scratchy stuff embedded in it that helps to scrape the gunk off your hands, plus it smells really nice and doesn't make your skin dry out. Crazy as it is, this is the best souvenir I brought home and it always brings back fond memories of that trip.
After taking Wednesday off to enjoy some vineyards at Niagara on the Lake we started on the wall paint. The Big Man is an excellent trim taper and paint cutter inner (two tasks that I hate) and I am an excellent roller. Together we're a great painting team!
This is after the first coat was done. I have to give a smoochy thank you to our friends Mr. Mister. They have a decorating business and use nothing but Sico Cashmere Paint. OMG this stuff is fantastic! It is more expensive than your average brand of paint but so worth the extra $20.00 a can. It has no smell, covers fully with two coats, does not "spit"when rolling, cleans up very easily, and dries to a perfect finish with no visible roller lines. I highly recommend this paint!

We used the air tools once again to add trim to the top and bottom of all the cabinet facings.
 Almost there........
At the bottom of the cabinets we use added trim as well.

We added new door pulls.....hmmm, I just noticed that little blob of paint under the ledge. Thankfully you can't see it from up above and generally people don't lay on my kitchen floor so I should be OK!

We decided to add wall board to the side of all the exposed cabinet edges. This stuff is very inexpensive and is made of what looks like recycled cardboard and wood fibres. Once painted it looks like real wood and really added that something special!
 See how great that looks!!
 I also have to give a big Thank You to RONA located in South Whitby. At no extra charge they cut all of the bead board to our exact measurements. I had also gone back for an extra small can of paint to finish off the cabinets on the Monday night. I'd already purchased a small tin earlier in the day and brought it back with me so they could match the paint colour code on the label.
I couldn't find another small can on the shelf and asked for some help. The service girl checked their records which indicated that they had more in stock but she couldn't find it either. She asked if I had my bill, then she took back my already purchased small tin and replaced it with the large can at no extra charge!

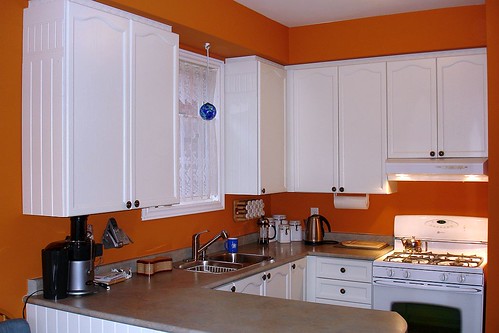
The picture above shows the wall board and trim added to the sides and tops of the cabinets around the sink. I still have my crappy curtains but I'm hoping to replace them with California Shutters some time soon.


Since we spend a great deal of time in kitchen, we swapped out our TV from the bedroom because it is much bigger. Basically I just fall asleep listening to the news in bed so it seemed such a waste not to enjoy the big screen in the kitchen especially since we have an HD satellite box and HD cables.
It might not have been a cruise but the week was filled with good food, wine, cheesy horror movies and great dancing tunes. Thanks Big Man I couldn't have done it with out you!! XOXO

4 comments:
Wow, your kitchen looks great! I love the color of the walls. And those cabinets really highlight the color!
great job on the kitchen. everything looks so nice and fresh and new. way to go doing it yourself. not a bad price for the total makeover either. thanks for sharing.
Mmmmm, come over. I have some projects.....
Hi Sara, Renee and Jocelyn!
Thanks for all the lovely comments on the kitchen reno. Glad you like it!
Post a Comment